We should all have a solid command of the ABCs of baking. Thankfully, Food52's Test Kitchen Manager Erin McDowell is here, with tips and tricks to help you master the most essential desserts and the simplest breads.
Today: Erin un-curls the cinnamon roll, from the dough to the filling to the frosting on top.
In my family, giant, gooey cinnamon rolls are a staple for special occasion breakfasts. Whether they came from the bakery down the road or fresh from my grandma’s oven, they’d be gone crazy fast—and not a speck of icing left behind.
To me, a good cinnamon roll is made with a flavorful dough (butter and yeast, y’all), a solid filling, and a killer frosting. But a great recipe is just the start: Knowing how to work your dough, handle it, assemble it, and bake it are the real keys to success. And if the way these cinnamon rolls were devoured in the Food52 offices is any indication (it was like a swarm of adorably hungry, ooo-ing/aahing vultures, with eyes rolled back in their heads and fingers licked clean), the family legacy is very safe, indeed.
Here's everything you need to know to make the best cinnamon rolls of your life:
(You can also head straight to the ingredient list and hightail it to the kitchen.)
* * * * *
1. The Dough
The dough is the base of any good cinnamon roll. In my opinion, it should be soft, buttery, and yeasty. For this reason, I like to use a simplified take on a brioche. Like brioche, this dough is enriched with eggs, milk, and plenty of butter, but unlike brioche, it’s a bit more forgiving and a bit easier to work with. Many other recipes for cinnamon rolls, on the other hand, call for a slightly less enriched dough, most commonly known as “sweet dough,” which serves as the basis for lots of other breakfast pastries and breads.
Regardless of the type of dough you choose, the goal is to use a dough that has been mixed to full or intense gluten development. This dough will be stable and flexible enough that you can roll it out into a thin rectangle, yet it will be strong enough to handle being spread with filling and rolled up tightly.
Because I don’t relish waking up at 4 A.M. to bake breakfast, I like to mix my dough the day before and refrigerate it overnight. In addition to saving some time the morning of, this has a few other advantages:
- First, you can mix the dough without thinking ahead: It's fine to use milk and eggs cold from the fridge (you don't have to wait for them to come to room temperature).
- Also, the flavor of the dough will benefit from a slow rise overnight in the fridge. This is especially great for highly enriched dough, which tends not to rise as much as lean dough and therefore benefits from a slow rise, during which the yeast feeds on the sugar and other enrichments, creating an excellent flavor (for all you hardcore yeast-lovers out there).
- And if all that wasn’t enough for you, cold enriched dough is a lot easier to work with. For me, this is especially important in the summer, when no amount of air conditioning can make my kitchen cool. The last thing you want when you roll out your beautiful dough is a soft, soggy mess.
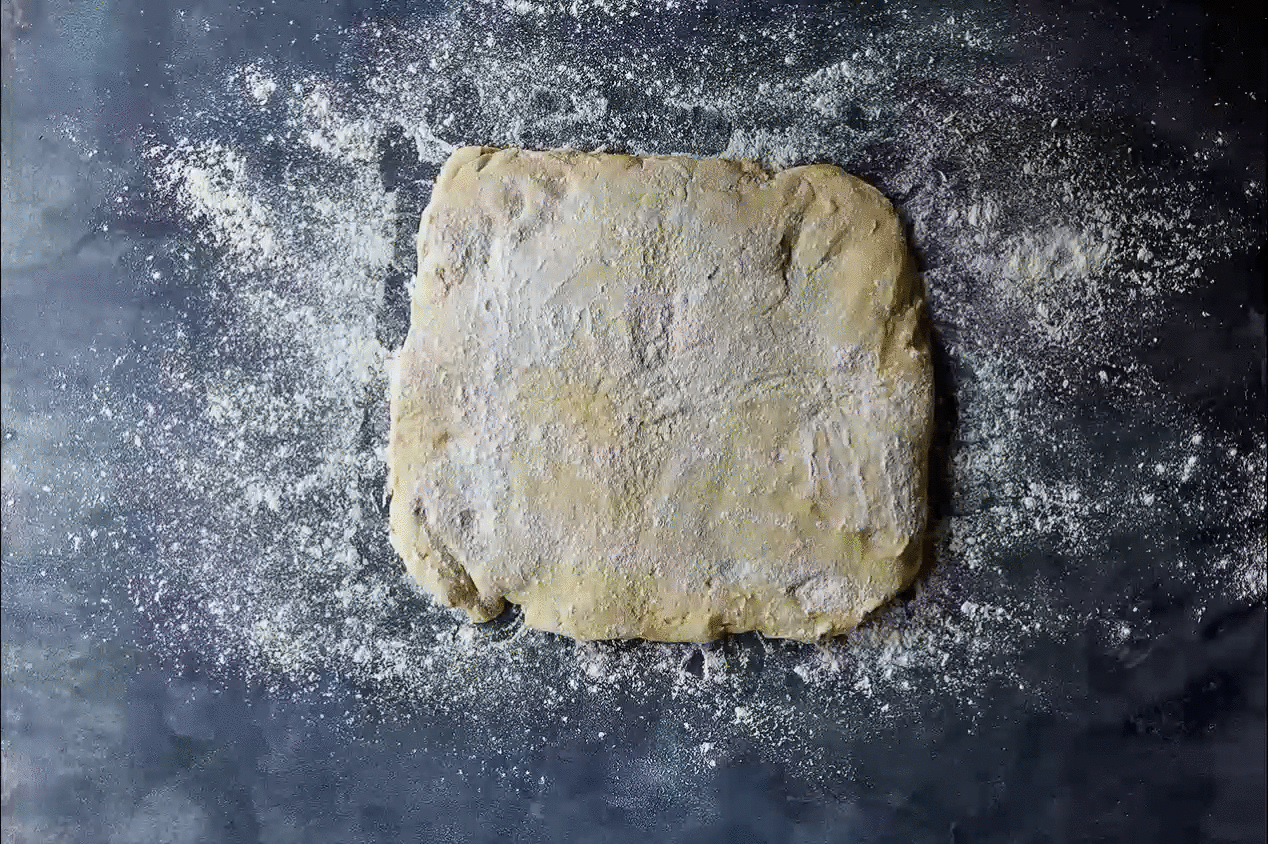
Mix the dough according to the recipe’s instructions, let it have its first rise (at room temperature), then pat it out onto a parchment-lined baking sheet. At this stage, it's ideal to keep the dough rectangular and even in thickness, as it will aid in the final rolling and shaping of the dough. If the dough is super sticky, I’ll spray nonstick spray on my hands and use that to help me press the dough out. Then I cover the dough directly with plastic wrap and transfer it to the fridge, where it will stay overnight.
Note: If you’re really an all-in-one day type of baker, no worries: Use warm liquid and room temperature eggs (this will speed up the fermentation process to compensate for the shorter rising time), then let the dough rise as directed by the recipe. Before rolling out the dough, you'll pop it in the fridge for at least 1 hour or in the freezer for at least 15 minutes—you’ll get a similar chilled effect. Then, proceed with the recipe as written.
* * * * *
2. The Filling
Since the filling is all about building flavor, the base of most fillings is, naturally, butter. But you don’t have to rely on butter for the base—cream cheese, another soft cheese, or even coconut oil could all work.
For sweetness, I like to use a combination of brown sugar and granulated sugar, partially for the texture and partially for the flavor (dear molasses, I heart you), and partially for the color (the darker the filling, the more striking the contrast between the dough and the spiral inside, which just makes me happy). As with the butter, there is also flexibility with the sweetener and the flavorings, and I especially love using fresh fruit or nuts. Maple sugar and pecans? Dig. Mascarpone cheese and fresh blueberries? Super dig. I even like to toss all of the above out of the equation and just spread really good jam all over the dough. If you like your filling to be more substantial, you might want to consider adding an egg or some flour (or other thickener); this will give you a more defined layer of filling in the finished roll. I keep my filling pretty simple so that I can make these even before I’ve had coffee, plus I like all the flavors to just meld together in the oven.
* * * * *
3. The Assembly
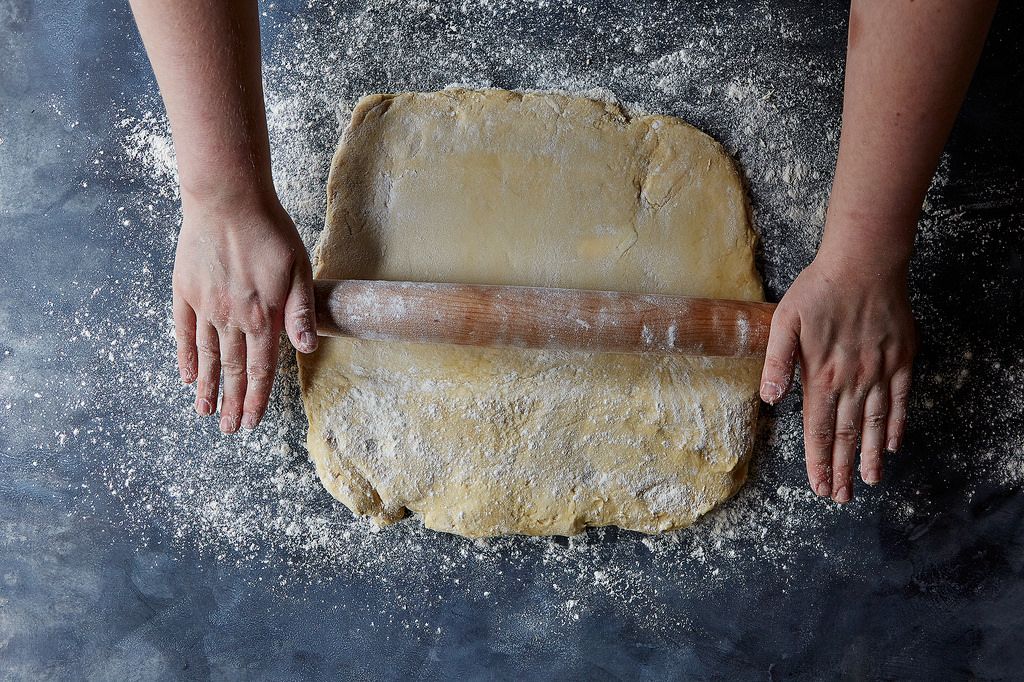
Here is where it all comes together, and where I get the most questions. I take the dough cold from the refrigerator and turn it out onto a lightly floured surface. Since the dough has been resting on a piece of parchment, I peel that away and flour the surface of the dough. Since I like my cinnamon rolls to have plenty of texture, I roll out the dough to about 1/2-inch thick. If you like a super chewy and doughy cinnamon roll, you may want to aim for closer to 3/4-inch thick. If you like maximum filling to dough ratio, you may want to go closer to 1/4-inch thick.
It’s more important that you maintain a consistent dough thickness than a particular size. I say this because if you use a recipe other than the one attached to this article, it may yield a different amount of dough; rather than suggesting you roll into a 12- x 17-inch rectangle, for example, I’d rather recommend with total certainty that you aim for an appropriate thickness. I roll out the dough to the proper thickness, using a dough scraper to maintain a rectangular shape to the edges while I work. The more squared off the edges, the more “perfect” the roll will be. The takeaway here? If it’s not a perfect rectangle, it’s really no big deal—you’ll just end up with some pieces that are slightly wonkier than the rest. If the dough is feeling very tacky or soft after rolling, it’s best to throw it back in the refrigerator or freezer for 10 to 15 minutes. Otherwise, apply your filling right away.
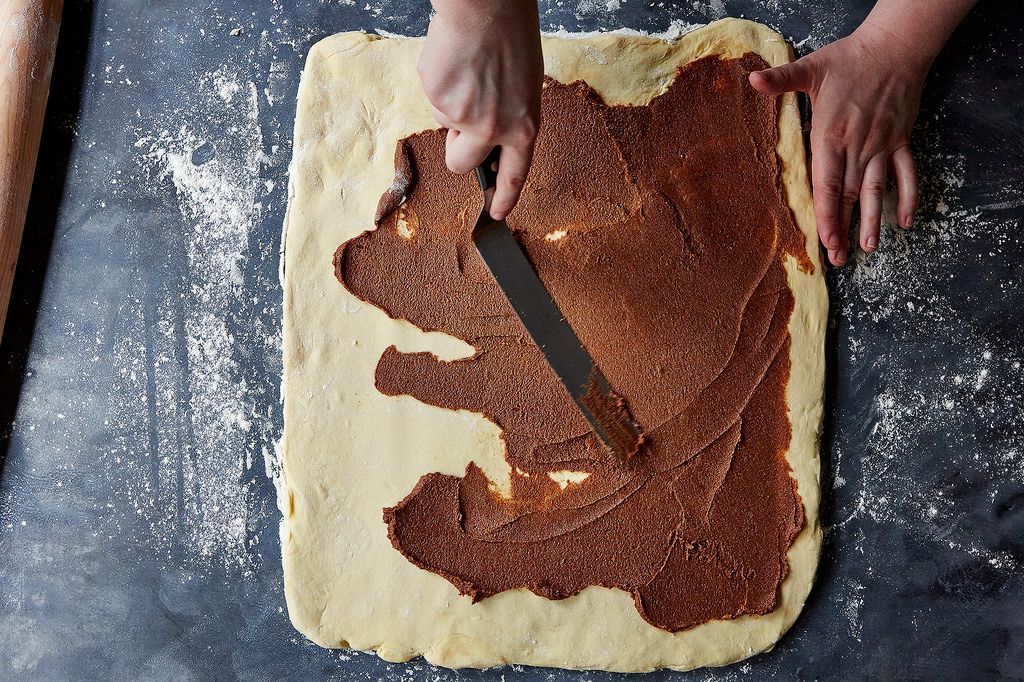
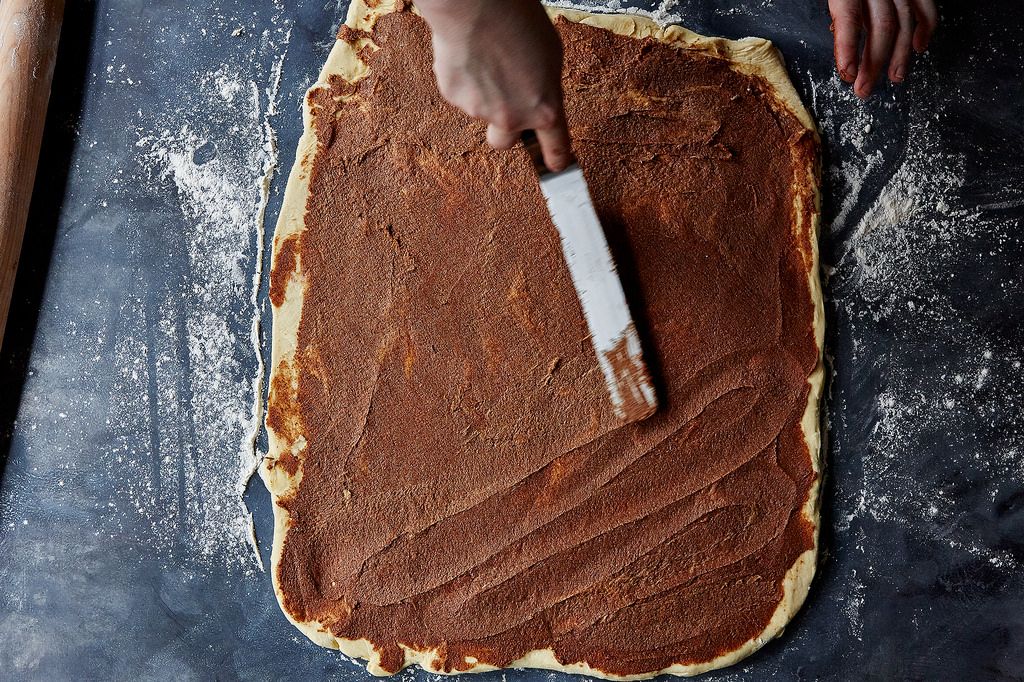
I dollop my spreadable filling all over the surface of the dough, then use an offset to spread it into an even layer. The main goal is to get the filling all the way to the edges of the dough for maximum coverage of cinnamon-y goodness.
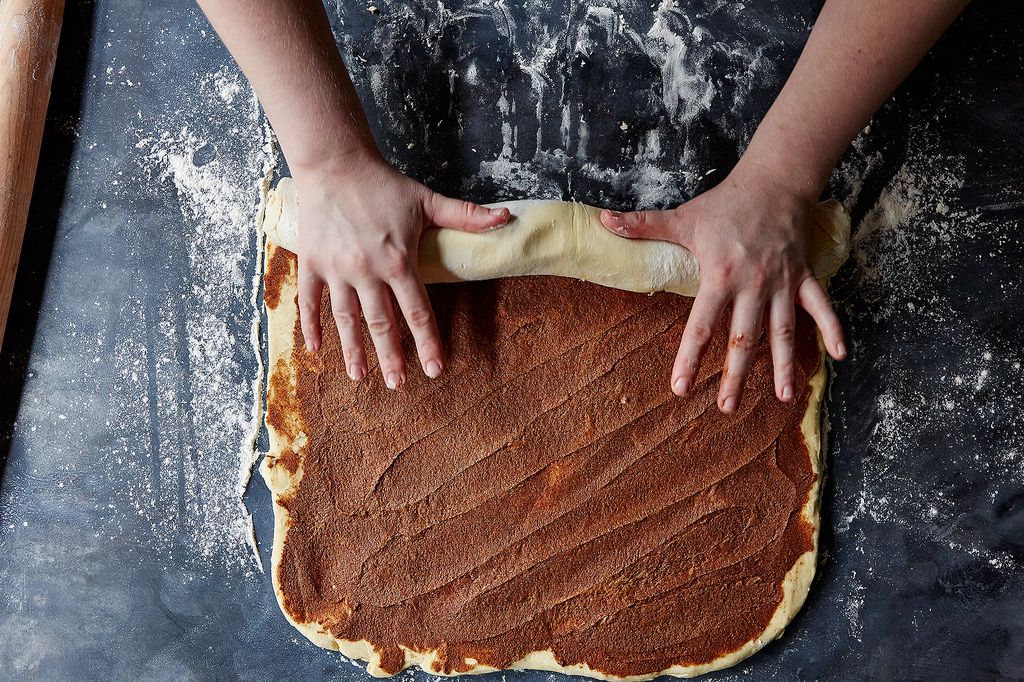
To roll the dough into a spiral, make sure one of the longer edges of the rectangle is facing you. Starting with the long side closest to you, begin to roll the dough away from you. The easiest way to do this is to form C-shapes with both of your hands, with your thumbs pushing at the base edge of the dough and your fingers keeping the roll tight from above while you work. Continue pushing the dough up with your thumbs to roll it into a spiral. The tighter the spiral, the easier the dough will be to cut. But don’t make the dough too tight or it might not expand evenly and properly (for the record, I’ve never seen anyone effectively roll an enriched dough too tight. It’s not particularly easy to do so).
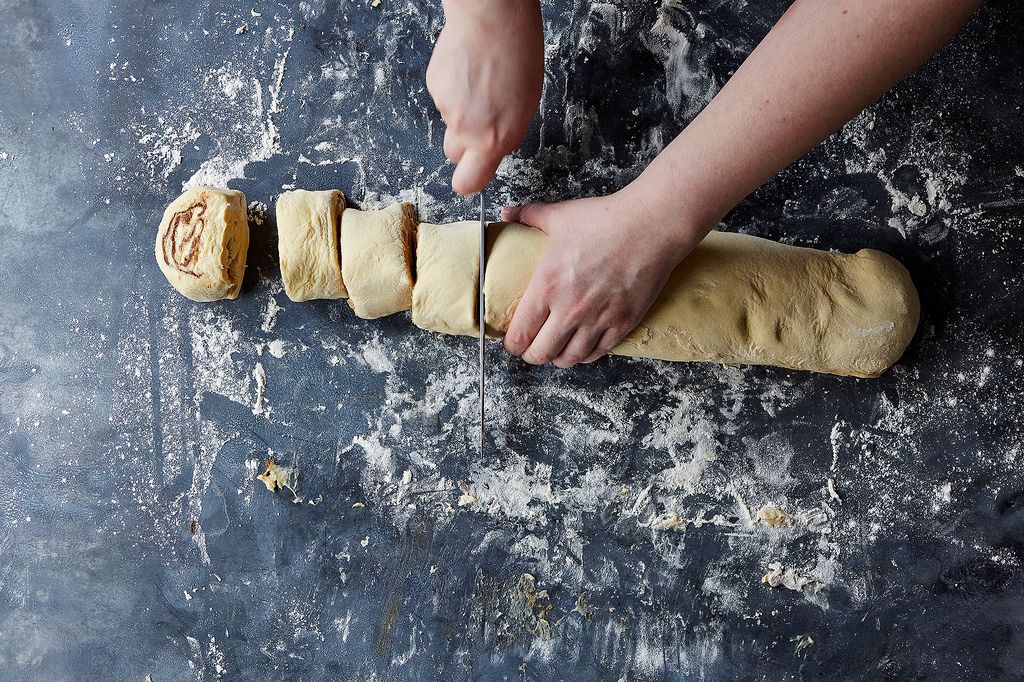
If the dough is sticky or tacky, transfer the roll to a baking sheet and chill it in the fridge or freezer until it’s firm to the touch. When it’s cool enough, use a serrated knife to cut the dough into individual pieces. Why a serrated knife? With a regular knife (or even a slicer), you either have to press down—which smushes the layers together—or use a sawing motion, which can create uneven lines in the cut side. Some people like to use plain dental floss or twine to cut the rolls—this definitely works to make a pretty clean cut. The thicker you cut the rolls, the more monstrous they will be (think Cinnabon-style). But too thin isn’t good because you won’t get that ooey, gooey center everyone loves so much. My ideal width is 1 1/2 inches (2 inches if I’m feeling saucy).
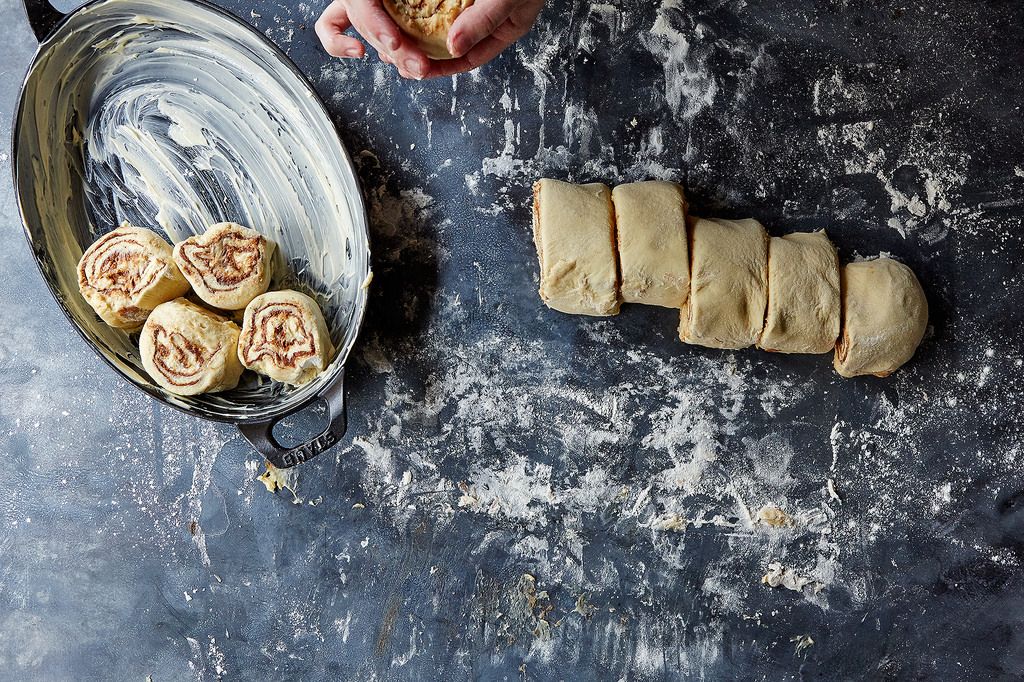
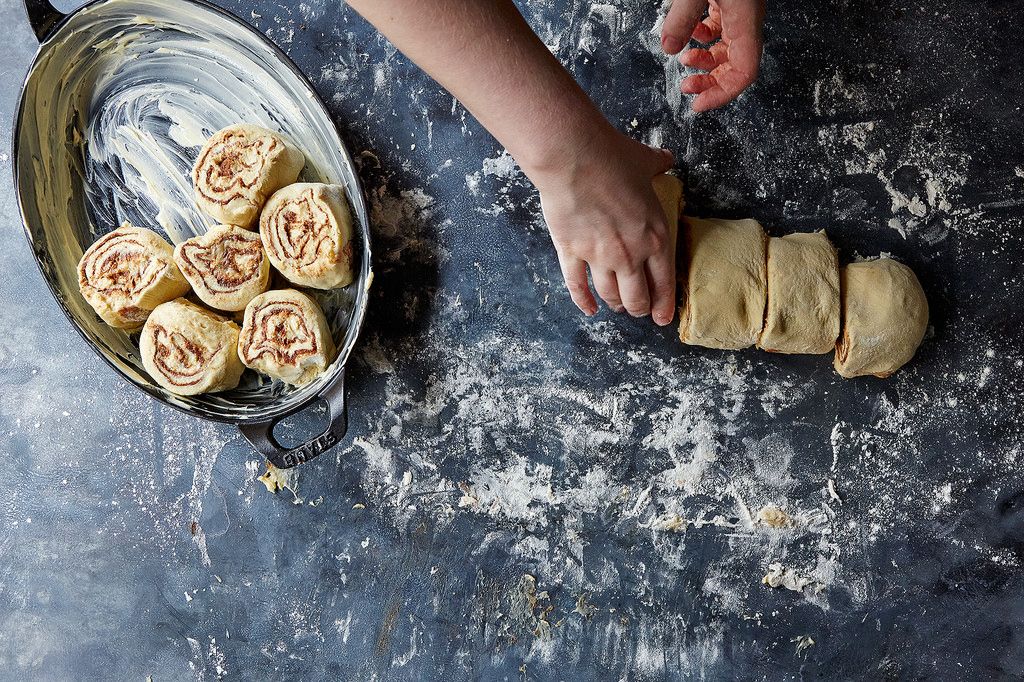
Arrange the cut rolls in a generously buttered baking dish (you’ve already used a few sticks, so why stop now?). I like to give the rolls a bit of room to expand, leaving 1/4 inch between each one inside the pan. If you place the rolls close together, it can force them to rise upward (meaning the middle of the spiral may be higher than the outer edges of the roll). If you like this, go to town. If you want even rolls, give them a little room.
* * * * *
4. The Baking
In theory, this is the easy part. I like to let the rolls rise one more time in a warm spot (near the preheating oven, for example)—you don’t need too long here, just 30 to 45 minutes.
Right before baking, I egg-wash the rolls to encourage even browning and give a little shine. Remember that enriched dough is going to have no problem browning, so you don’t want to go too high with your oven temperature—375° F is my preference.
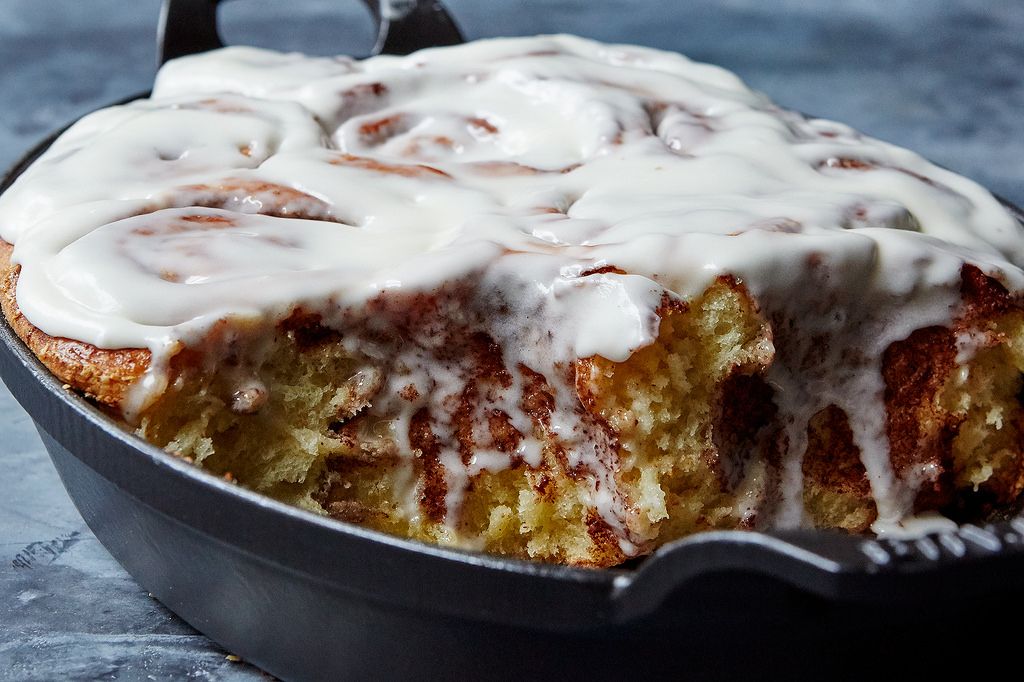
Finally, baking time is the most important element of all. A great man once said: “'Tis a far, far better thing to underbake your cinnamon rolls slightly…” Okay, no one may have ever said that, but I’m saying it now: Don’t overbake your cinnamon rolls! They’ll be crunchy, not soft. They’ll be firm, not gooey. Err on the side of under-baking and remember that they will carry-over-cook a little bit (and more so if you bake them in a dark metal or cast-iron pan). Baked cinnamon rolls should be golden on the surface, with a melty and/or bubbly filling. If you press a finger into the center of a spiral it should be set but still have some give.
* * * * *
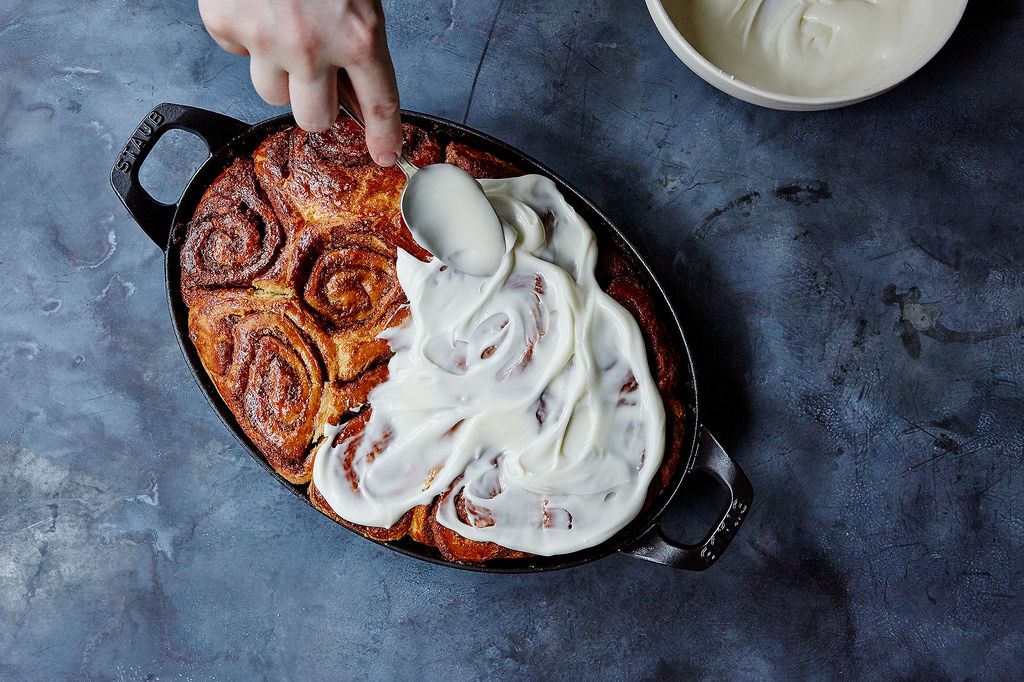
5. The Frosting
I still do this the way my grandma taught me, which is to add some cream to powdered sugar and throw a little vanilla in too. Yes, this is decadent. Yes, you can use milk instead. In fact, you can use any kind of frosting you like: cream cheese-based, royal icing, or anything really! I let the rolls cool for 10 to 15 minutes before applying a generous smear of frosting while they’re still warm. This promotes the gooeyness and the frosting will melt a little before setting back up as it cools. You can also let the rolls cool completely before applying the frosting (you’ll definitely want to do this if you want a particular pattern or drizzle effect, as warm rolls will make it all run together).
* * * * *

6. The Serving
There was one sacred rule in our household: Cinnamon rolls should be warm. I serve mine fresh from the oven, but I can’t always be so lucky. As crazy as it sounds, you can warm your baked cinnamon rolls in the microwave (yes, the microwave). The oven can dry them out too much, but the microwave is wonderfully efficient. Ten to 15 seconds is usually all you need. You’ll almost forget that they aren’t fresh from the oven!
* * * * *
Makes 1 dozen big cinnamon rolls
For the dough:
22 ounces bread flour
3 1/2 ounces sugar
10 grams yeast
15 grams salt
8.6 ounces eggs (cold from the refrigerator)
7.7 ounces milk (cold from the refrigerator)
9 ounces soft unsalted butter, plus more for greasing the pan
For the filling:
1 1/2 sticks unsalted butter, melted
1/2 cup brown sugar
1/4 cup granulated sugar
1 1/2 tablespoons cinnamon
Pinch freshly grated nutmeg
Egg wash, for finishing
For the icing:
3 cups powdered sugar
1/3 cup heavy cream, plus more as needed
1 teaspoon vanilla extract
See the full recipe (and save and print it) here.
Photos by Bobbi Lin
Written by: Erin Jeanne McDowell
Popular on Food52
49 Comments
Very yummy!
Also, re: those comments about not having a scale and 'not being professional bakers', you don't need to be professional to use a scale and using a scale is way more accurate than cups. Also, there are online converters, so no need to be snarky when free websites don't meet your needs entirely.
I don’t have a scale .
Read more: http://www.trueceylonspices.com/ceylon-cinnamon/
How many eggs is your 8.6oz?
How many cups of sugar is your 3 1/2 oz - and how many cups of flour is 22oz.
How many tablespoons is 10 grams?...
I don't want a math test before I use a recipe!!!
Remember...We are homemakers - not professional Chiefs.
See what other Food52 readers are saying.